Organizations are working towards centralizing their identity and access strategy across all their applications, including on-premises, third-party, and applications on AWS. Many organizations use identity providers (IdPs) based on OIDC or SAML-based protocols like Microsoft Azure Active Directory (Azure AD) and manage user authentication along with authorization centrally. This authorizes users to access Amazon Quick Sight assets-analyses, dashboards, folders, and datasets-through centrally managed Azure AD and AWS IAM Identity Center (successor to AWS Single Sign-On).
IAM Identity Center is an authentication process that allows users to sign into multiple applications with a single set of usernames and passwords. IAM Identity Center makes it easy to centrally manage access to multiple AWS accounts and business applications. It provides your workforce with single sign-on (SSO) access to all assigned accounts and applications from one place.
In this post, we walk you through the steps required to configure federated SSO along with automated email sync between Quick Sight and Azure AD via IAM Identity Center. We also demonstrate ways System for Cross-domain Identity Management (SCIM) keeps your IAM Identity Center identities in sync with identities from your IdP.
Solution overview
The following is the reference architecture for configuring IAM Identity Center with Azure AD for automated federation to Quick Sight and the AWS Management Console.

The following are the steps involved to set up federated SSO from Azure to Quick Sight:
- Configure Azure as an IdP in IAM Identity Center.
- Register an IAM Identity Center application in Azure AD.
- Configure the application in Azure AD.
- Enable automatic provisioning of users and groups.
- Enable email syncing for federated users in Quick Sight console.
- Create a Quick Sight application in IAM Identity Center.
- Add the IAM Identity Center application as a SAML IdP.
- Configure AWS Identity and Access Management (IAM) policies and roles.
- Configure attribute mappings in IAM Identity Center.
- Validate federation to Quick Sight from IAM Identity Center.
Prerequisites
To complete this walkthrough, you must have the following prerequisites:
- An Azure AD subscription with Administrator permission.
- Quick Sight account subscription with Administrator permission.
- IAM Administrator account.
- IAM Identity Center Administrator account.
Configure Azure as IdP in IAM Identity Center
To configure Azure as an IdP, complete the following steps:
- On the IAM Identity Center console, choose Enable.

- Choose Choose your identity source.

- Select External identity provider to manage all users and groups.
- Choose Next.

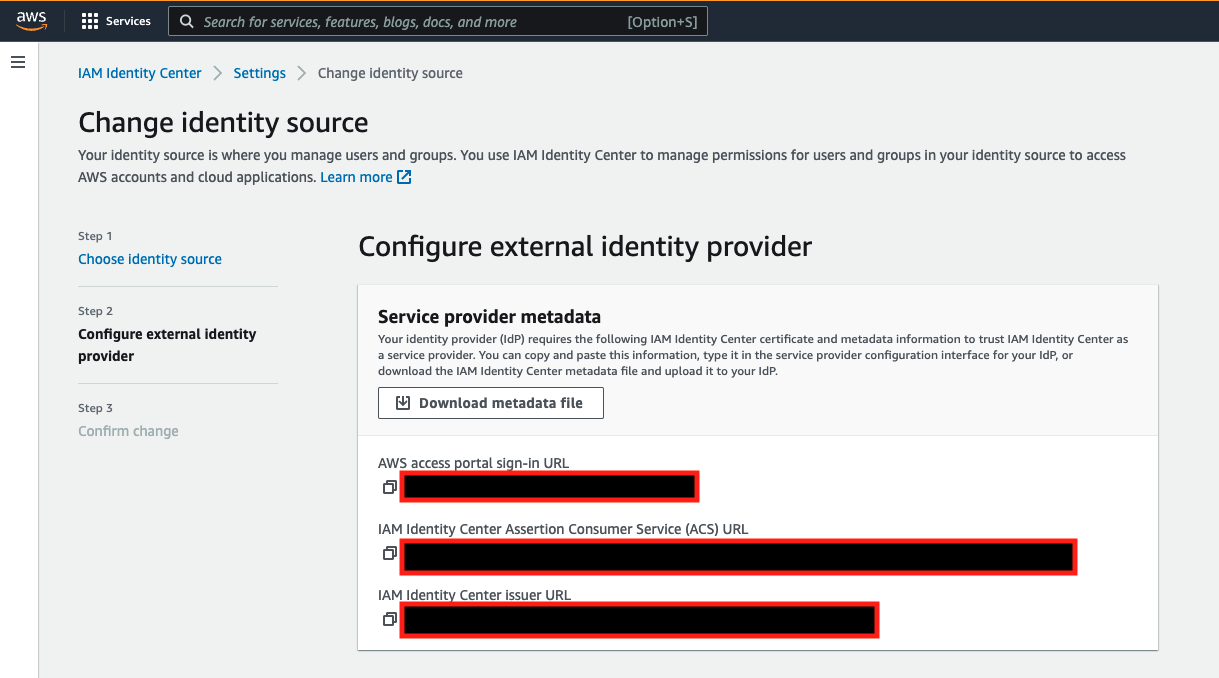
- In the Configure external identity provider section, download the service provider metadata file.
- Save the AWS access portal sign-in URL, IAM Identity Center Assertion Consumer Service (ACS) URL, and IAM Identity Center issuer URL.
These are used later in this post.

- Leave this tab open in your browser while proceeding to the next steps.


Register an IAM Identity Center application in Azure AD
To register an IAM Identity Center application in Azure AD, complete the following steps:
- Sign in to your Azure portal using an administrator account.
- Under Azure Services, choose Azure AD and under Manage, choose Enterprise applications.

- Choose New application.
- Choose Create your own application.
- Enter a name for the application.
- Select the option Integrate any other application you don’t find in the gallery (Non-gallery).
- Choose Create.


Configure the application in Azure AD
To configure your application, complete the following steps:
- Under Enterprise applications, choose All applications and select the application created in the previous step.
- Under Manage, choose Single Sign-on.
- Choose SAML.

- Choose Single Sign-on to set up SSO with SAML.
- Choose Upload metadata file, and upload the file you downloaded from IAM Identity Center.

- Choose Edit to edit the Basic SAML Configuration section.


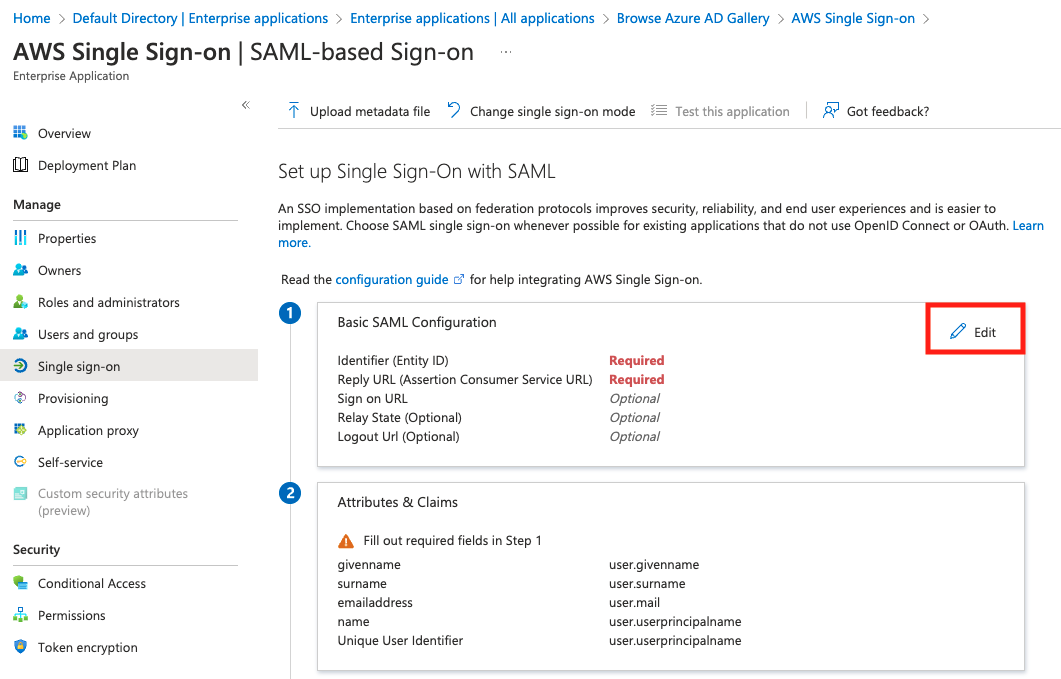
- For Identifier (Entity ID), enter the IAM Identity Center issuer URL.
- For Reply URL (Assertion Consumer Service URL), enter the IAM Identity Center ACS URL.
- Under SAML Signing Certificate, choose Download next to Federation Metadata XML.


We use this XML document in later steps when setting up the SAML provider in IAM and in IAM Identity Center.
- Leave this tab open in your browser while moving to the next steps.
- Switch to the IAM Identity Center tab to complete its setup.
- Under Identity provider metadata, choose IdP SAML metadata and upload the federation metadata XML file you downloaded.

- Review and confirm the changes.


Enable automatic provisioning of users and groups
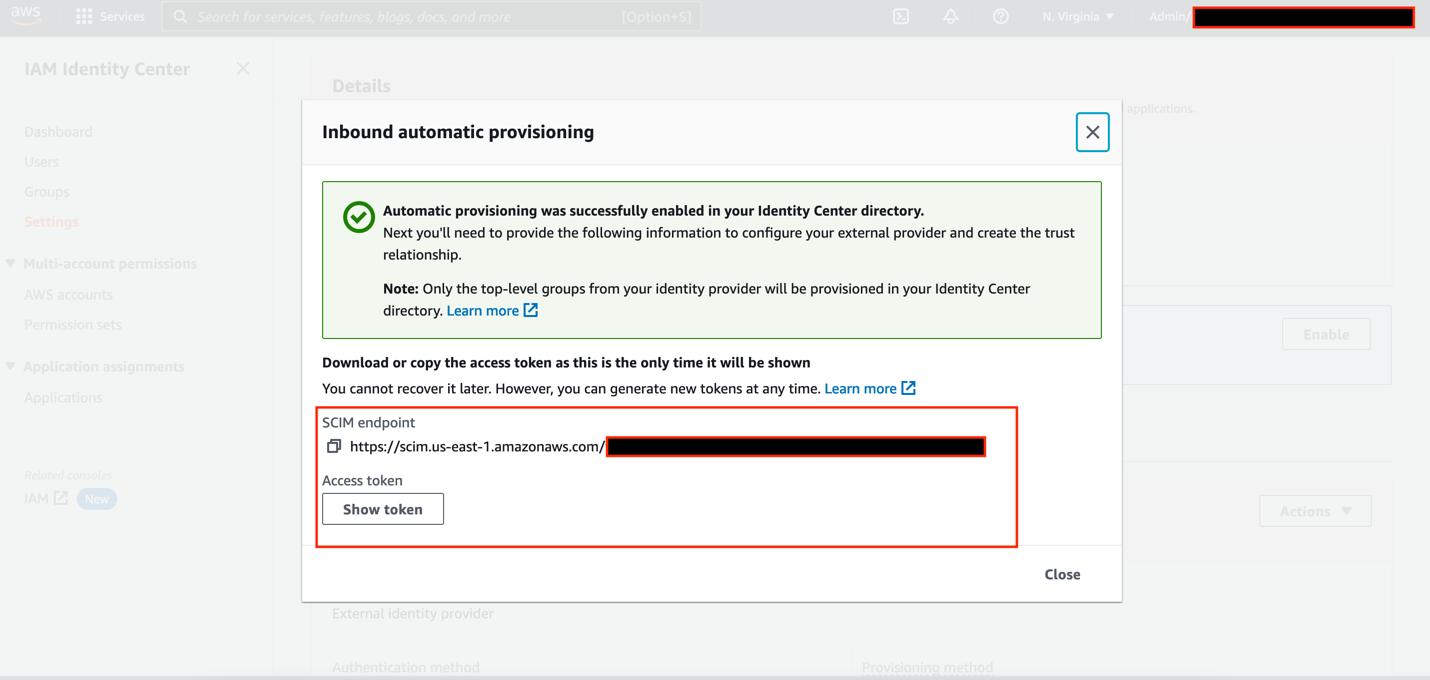
IAM Identity Center supports System for Cross-domain Identity Management (SCIM) v2.0 standard. SCIM keeps your IAM Identity Center identities in sync with external IdPs. This includes any provisioning, updates, and deprovisioning of users between IdP and IAM Identity Center. To enable SCIM, complete the following steps:
- On the IAM Identity Center console, choose Settings in the navigation pane.
- Next to Automatic provisioning, choose Enable.

- Copy the SCIM endpoint and Access token.

- Switch to the Azure AD tab.
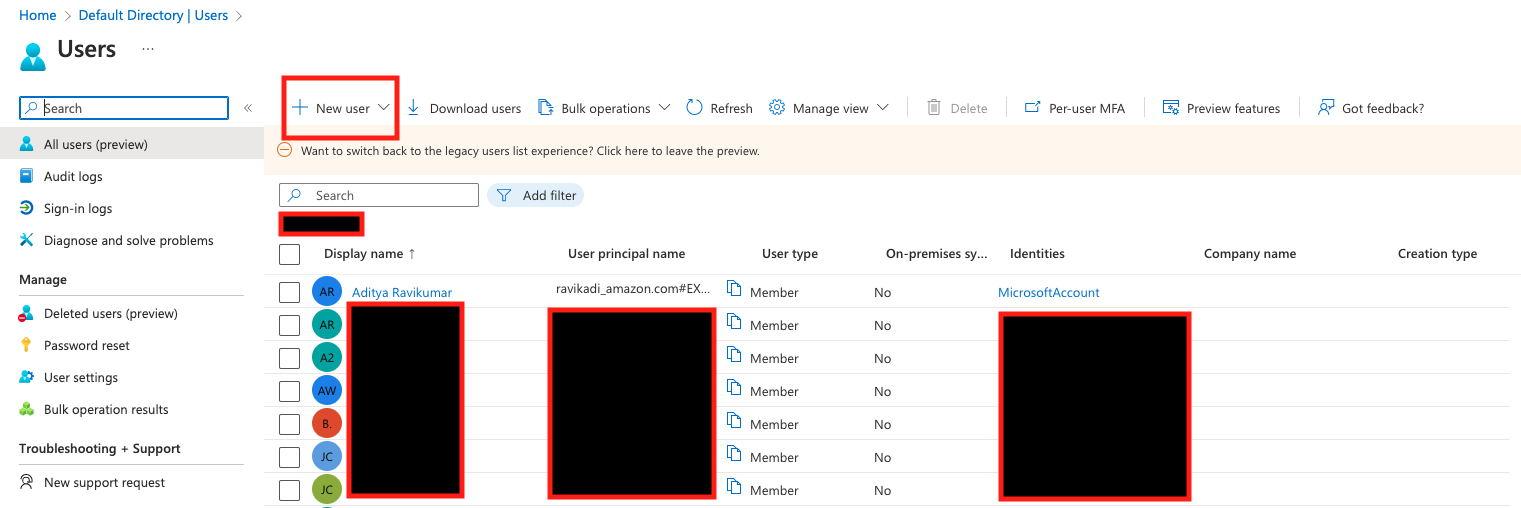
- On the Default Directory Overview page, under Manage, choose Users.

- Choose New user and Create new user(s).
Make sure the user profile has valid information under First name, Last name, and Email attribute.

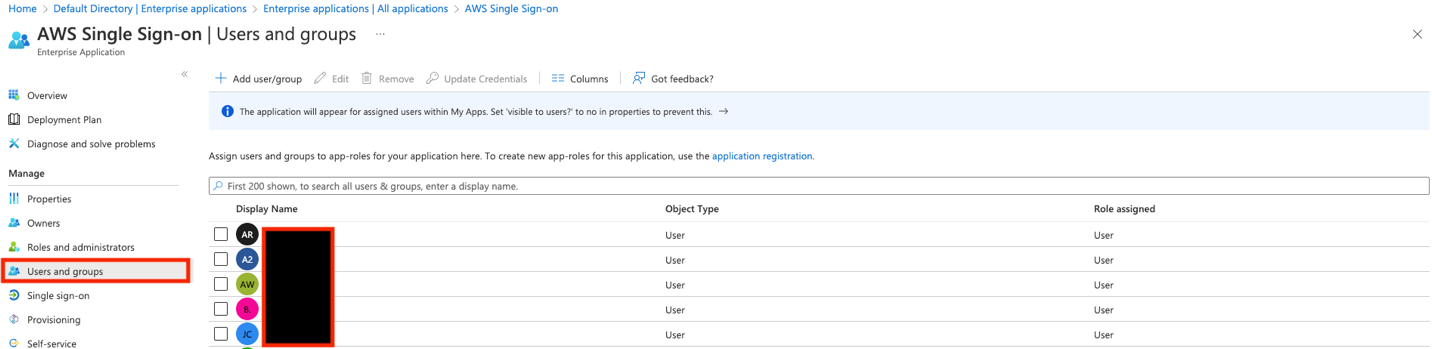
- Under Enterprise applications, choose All applications and select the application you created earlier.
- Under Manage, choose Users and groups.

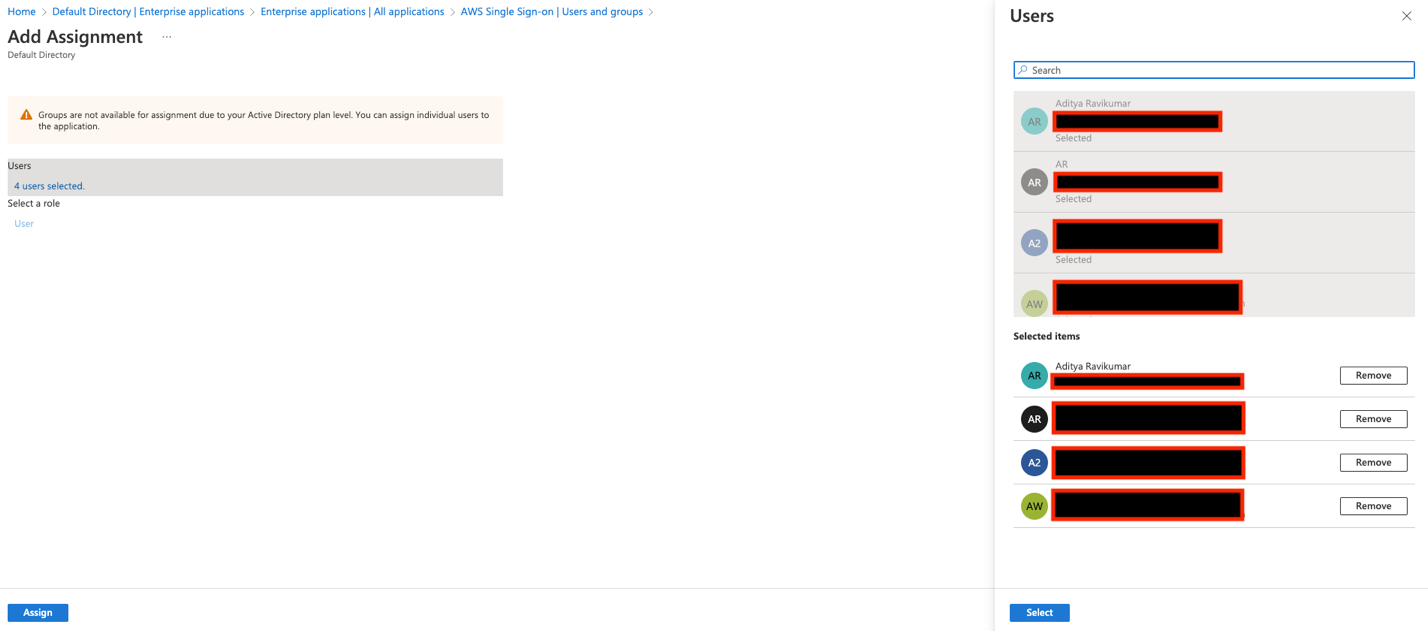
- Choose Add user/group, and select the users you created earlier.
- Choose Assign.

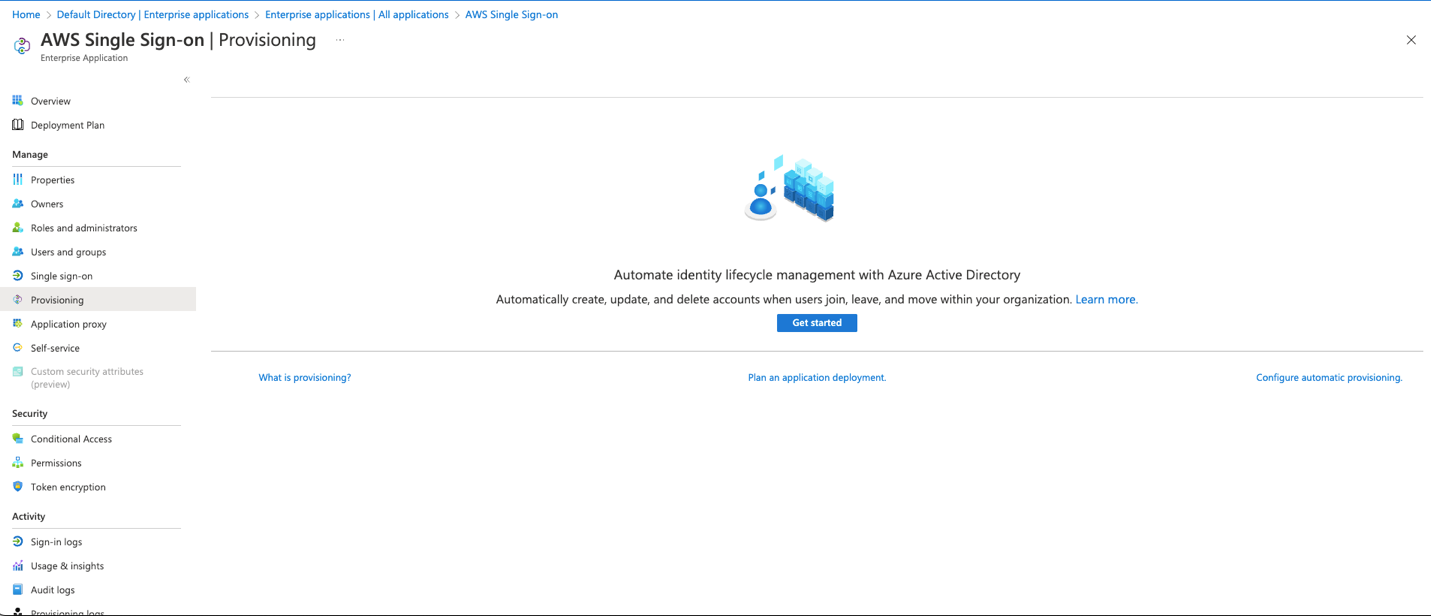
- Under Manage, choose Provisioning and Get started.

- Choose Provisioning Mode as Automatic.
- For Tenant URL, enter the SCIM endpoint.
- For Secret Token, enter the Access token.
- Choose Test Connection and Save.

- Under Provisioning, choose Start provisioning.


Make sure the user profile has valid information under First name, Last name, and Email attribute. This is the key value for email sync with Quick Sight.

On the IAM Identity Center console, under Users, you can now see all the users provisioned from Azure AD.

Enable email syncing for federated users in Quick Sight console
Complete the following steps to enable email syncing for federated users:
- Sign in as an admin user to the Quick Sight console and choose Manage Quick Sight from the user name menu.

- Choose Single sign-on (SSO) in the navigation pane.

- Under Email Syncing for Federated Users, select ON.


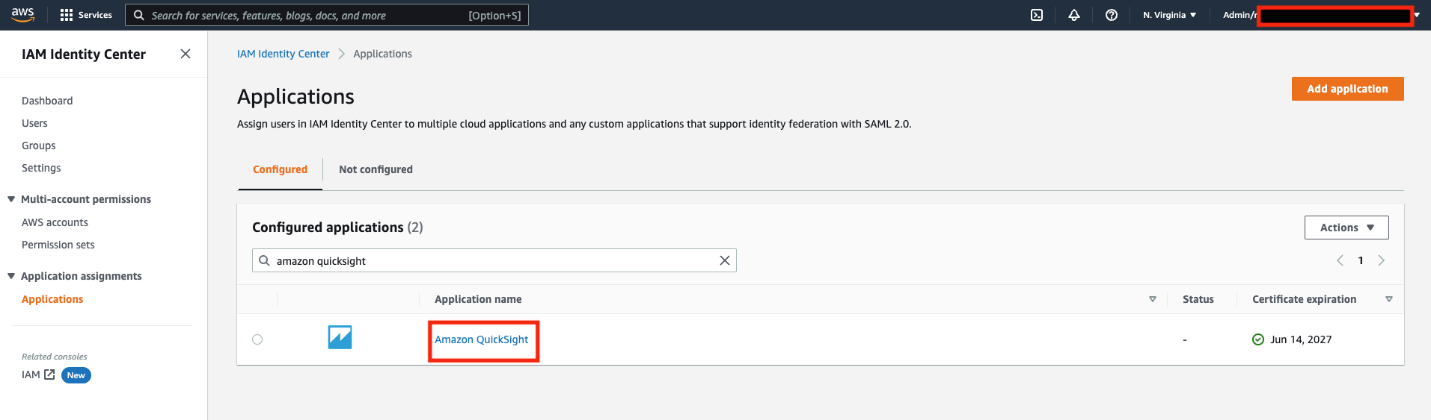
Create a Quick Sight application in IAM Identity Center
Complete the following steps to create a custom SAML 2.0 application in IAM Identity Center.
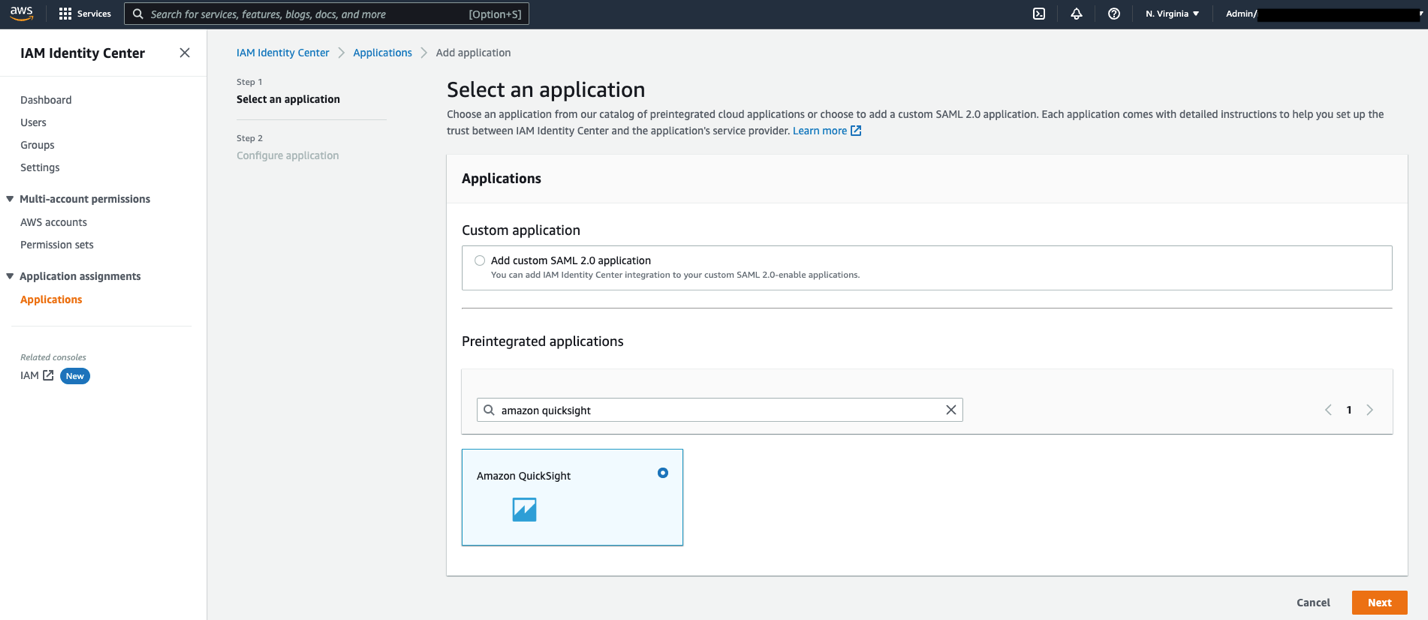
- On the IAM Identity Center console, choose Applications in the navigation pane.
- Choose Add application.

- Under Preintegrated applications, search for and choose Amazon Quick Sight.
- Choose Next.

- For Display name, enter a name, such as
Amazon Quick Sight. - For Description, enter a description.
- Download the IAM Identity Center SAML metadata file to use later in this post.
- For Application start URL, leave as is.
- For Relay state, enter
https://quicksight.aws.amazon.com. - For Session duration, choose your session duration. The recommended value is 8 hours.
- For Application ACS URL, enter
https://signin.aws.amazon.com/saml. - For Application SAML audience, enter
urn:amazon:webservices. - Choose Submit
After your settings are saved, your application configuration should look similar to the following screenshot.


You can now assign your users to this application, so that the application appears in their IAM Identity Center portal after login.
- On the application page, under Assigned users, choose Assign Users.

- Select your users.
- Optionally, if you want to enable multiple users in your organization to use Quick Sight, the fastest and easiest way is to use IAM Identity Center groups.
- Choose Assign Users.


Add the IAM Identity Center application as a SAML IdP
Complete the following steps to configure IAM Identity Center as your SAML IdP:
- Open a new tab in your browser.
- Sign in to the IAM console in your AWS account with admin permissions.
- Choose Identity providers in the navigation pane.
- Choose Add provider.
- Select SAML for Provider type.
- For Provider name, enter
IAM_Identity_Center. - Choose Choose File to upload the metadata document you downloaded earlier from the Amazon Quick Sight application.
- Choose Add Provider.

- On the summary page, record the value for the provider ARN (
arn:aws:iam::).:saml-provider/IAM_Identity_Center

You will use this ARN while configuring claims rules later in this post.
Configure IAM policies
In this step, you create three IAM policies for different role permissions in Quick Sight:
Quick Sight-Federated-AdminQuick Sight-Federated-AuthorQuick Sight-Federated-Reader
Use the following steps to set up Quick Sight-Federated-Admin policy. This policy grants admin privileges in Quick Sight to the federated user:
- On the IAM console, choose Policies in the navigation pane
- Choose Create policy.
- Choose JSON and replace the existing text with the following code:
Ignore the “Missing ARN Region: Add a Region to the quicksight resource ARN” error and continue. Optionally, you could also add a specific AWS region in the ARN.
- Choose Review policy
- For Name enter
Quick Sight-Federated-Admin. - Choose Create policy.
- Repeat these steps to create the
Quick Sight-Federated-Authorpolicy using the following JSON code to grant author privileges in Quick Sight to the federated user:
Ignore the “Missing ARN Region: Add a Region to the quicksight resource ARN” error and continue. Optionally, you could also add a specific AWS region in the ARN.
- Repeat these steps to create the
Quick Sight-Federated-Readerpolicy using the following JSON code to grant reader privileges in Quick Sight to the federated user:
Ignore the “Missing ARN Region: Add a Region to the quicksight resource ARN” error and continue. Optionally, you could also add a specific AWS region in the ARN.
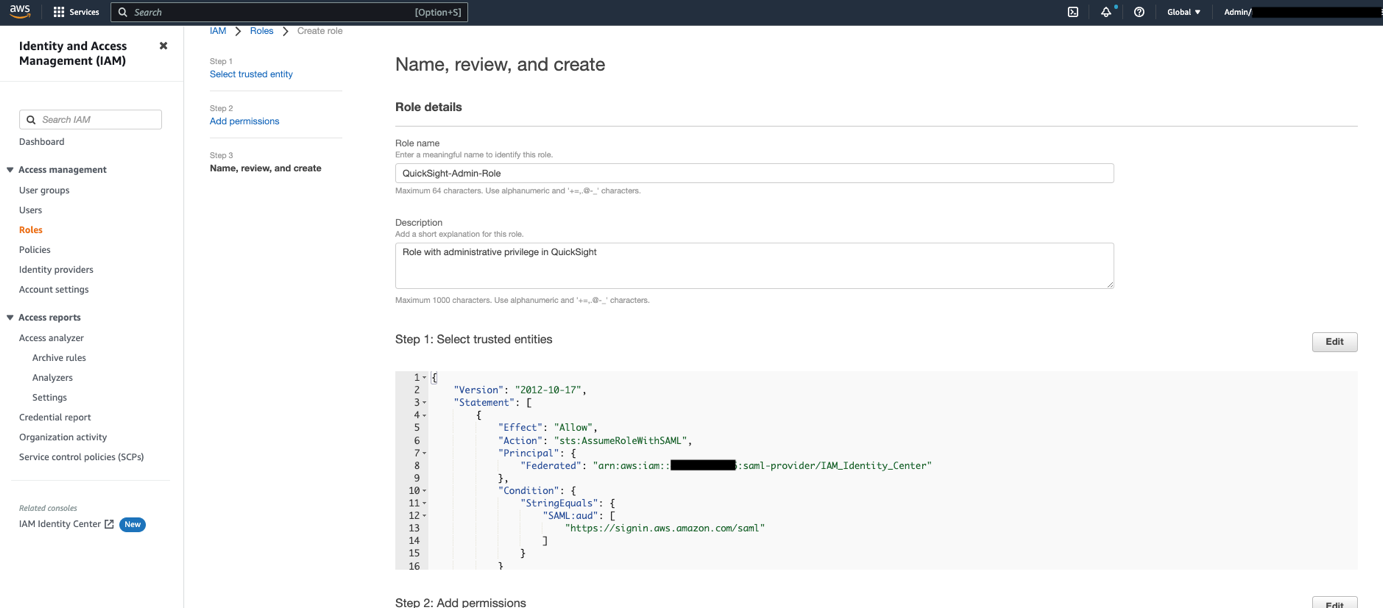
Configure IAM roles
Next, create roles that your Azure AD and IAM Identity Center users assume when federating into Quick Sight. The following steps set up the admin role:
- On the IAM console, choose Roles in the navigation pane.
- Choose Create role.
- For Select type of trusted entity, choose SAML 2.0 federation.
- For SAML provider, choose the provider you created earlier (
IAM_Identity_Center). - Select Allow programmatic and AWS Management Console access.
- For Attribute, make sure SAML:aud is selected.
- For Value, make sure
https://signin.aws.amazon.com/samlis selected. - Choose Next.

- Choose the
Quick Sight-Federated-AdminIAM policy you created earlier. - Choose Next: Tags.
- Choose Next: Review.
- For Role name, enter
Quick Sight-Admin-Role. - For Role description, enter a description.

- Choose Create role.
- On the IAM console, in the navigation pane, choose Roles.
- Choose the
Quick Sight-Admin-Rolerole you created to open the role’s properties. - Record the role ARN to use later.
- On the Trust relationships tab, choose Edit trust policy.

- For the policy details, enter the following JSON:
- Choose Update Policy.
- Repeat these steps to create the roles
Quick Sight-Author-RoleandQuick Sight-Reader-Role. Attach theQuick Sight-Federated-AuthorandQuick Sight-Federated-Readerpolicies to their respectively roles.


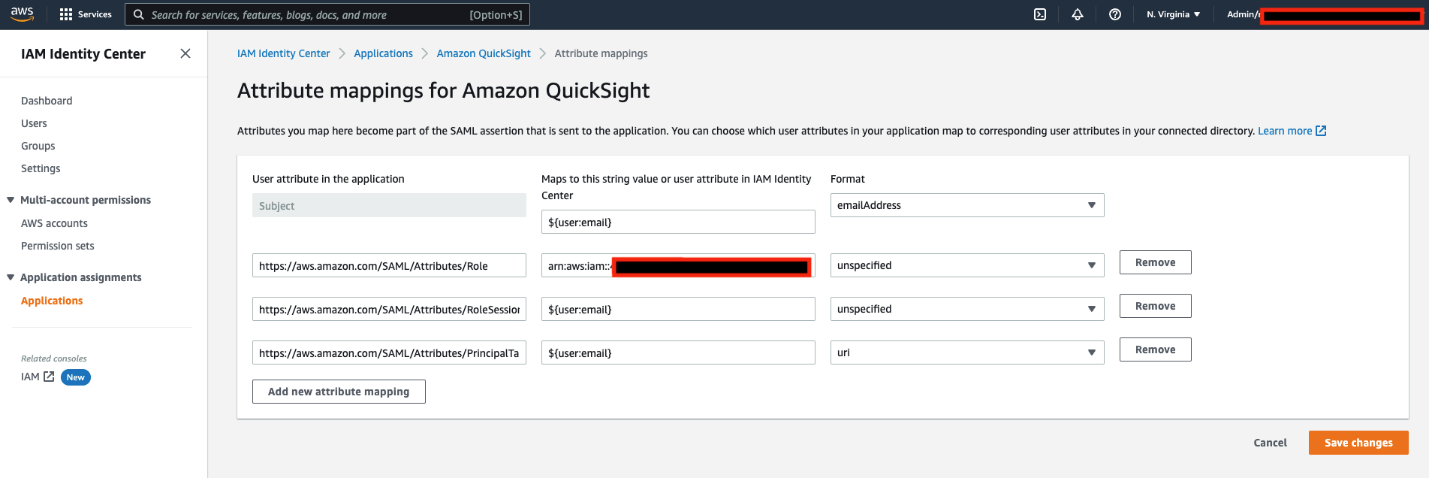
Configure attribute mappings in IAM Identity Center
The final step is to configure the attribute mappings in IAM Identity Center. The attributes you map here become part of the SAML assertion that is sent to the Quick Sight application. You can choose which user attributes in your application map to corresponding user attributes in your connected directory. For more information, refer to Attribute mappings.
- On IAM Identity Center console, choose Applications in the navigation pane.

- Select the
Amazon Quick Sightapplication you created earlier.

- On the Actions menu, choose Edit attribute mappings.
- Configure the following mappings:

| User attribute in the application | Maps to this string value or user attribute in IAM Identity Center | Format |
Subject |
${user:email} |
emailAddress |
https://aws.amazon.com/SAML/Attributes/Role |
arn:aws:iam:: , arn:aws:iam:: |
unspecified |
https://aws.amazon.com/SAML/Attributes/RoleSessionName |
${user:email} |
unspecified |
https://aws.amazon.com/SAML/Attributes/PrincipalTag:Email |
${user:email} |
url |
- Choose Save changes.

Validate federation to Quick Sight from IAM Identity Center
On the IAM Identity Center console, note down the user portal URL available on the Settings page. We suggest you log out of your AWS account first, or open an incognito browser window. Navigate to the user portal URL, sign in with the credentials of an AD user, and choose your Quick Sight application.


You’re automatically redirected to the Quick Sight console.


Summary
This post provided step-by-step instructions to configure federated SSO with Azure AD as IdP through IAM Identity Center. We also discussed how SCIM keeps your IAM Identity Center identities in sync with identities from your IdP. This includes any provisioning, updating, and deprovisioning of users between your IdP and IAM Identity Center.
If you have any questions or feedback, please leave a comment.
For additional discussions and help getting answers to your questions, check out the Quick Sight Community.
About the author
Aditya Ravikumar is a Solutions Architect at Amazon Web Services. He is based in Seattle, USA. Aditya’s core interests include software development, databases, data analytics and machine learning. He works with AWS customers/partners to provide guidance and technical assistance to transform their business through innovative use of cloud technologies.
 Srikanth Baheti is a Specialized World Wide Sr. Solution Architect for Amazon Quick Sight. He started his career as a consultant and worked for multiple private and government organizations. Later he worked for PerkinElmer Health and Sciences & eResearch Technology Inc, where he was responsible for designing and developing high traffic web applications, highly scalable and maintainable data pipelines for reporting platforms using AWS services and Serverless computing.

This is a companion discussion topic for the original entry at https://aws.amazon.com/blogs/big-data/enable-federation-to-amazon-quicksight-with-automatic-provisioning-of-users-between-aws-iam-identity-center-and-microsoft-azure-ad/