As the industry grows with more data volume, big data analytics is becoming a common requirement in data analytics and machine learning (ML) use cases. Data comes from many different sources in structured, semi-structured, and unstructured formats. For semi-structured data, one of the most common lightweight file formats is JSON. However, due to the complex nature of data, JSON often includes nested key-value structures. Analysts may want a simpler graphical user interface to conduct data analysis and profiling.
To support these requirements, AWS Glue DataBrew offers an easy visual data preparation tool with over 350 pre-built transformations. You can use DataBrew to analyze complex nested JSON files that would otherwise require days or weeks writing hand-coded transformations. You can then use Amazon Quick Sight for data analysis and visualization.
In this post, we demonstrate how to configure DataBrew to work with nested JSON objects and use Quick Sight for data visualization.
Solution overview
To implement our solution, we create a DataBrew project and DataBrew job for unnesting data. We profile the unested data in DataBrew and analyze data in Quick Sight. The following diagram illustrates the architecture of this solution.
Prerequisites
Before you get started, make sure you have the following prerequisites:
- An AWS account
- A basic understanding of Amazon Simple Storage Service (Amazon S3)
- A basic understanding of Quick Sight to create dashboards
- Permissions to create the DataBrew dataset, project, and jobs; S3 buckets; and Quick Sight dashboards
- An AWS Identity and Access Management (IAM) role that DataBrew can use or permission to create a new IAM role (see Adding and removing IAM identity permissions for more information)
Prepare the data
To illustrate the DataBrew functionality to support data analysis for nested JSON files, we use a publicly available sample customer order details nested JSON dataset.
Complete the following steps to prepare your data:
- Sign in to the AWS Management Console.
- Browse to the publicly available datasets on the Amazon S3 console.
- Select the first dataset (
customer_1.json) and choose Download to save the files on your local machine. - Repeat this step to download all three JSON files.

You can view the sample data from your local machine using any text editor, as shown in the following screenshot.

- Create input and output S3 buckets with subfolders
nestedjsonandoutputjsonto capture data. - Choose Upload and upload the three JSON files to the
nestedjsonfolder.


Create a DataBrew project
To create your Amazon S3 connection, complete the following steps:
- On the DataBrew console, choose Projects in the navigation pane.
- Choose Create project.
- For Project name, enter
Glue-DataBew-NestedJSON-Blog.

- Select New dataset.
- For Dataset name, enter
Glue-DataBew-NestedJSON-Dataset. - For Enter your source from S3, enter the path to the
nestedjsonfolder. - Choose Select the entire folder to select all the files.
- Under Additional configurations, select JSON as the file type, then select JSON document.

- In the Permissions section, choose Choose existing IAM role if you have one available, or choose Create new IAM role.
- Choose Create project.

- Skip the preview steps and wait for the project to be ready.
As shown in the following screenshot, the three JSON files were uploaded to the S3 bucket, so three rows of customer order details are loaded.
 The
The orderscolumn contains nested files. We can use DataBrew to unnest or nest transform to flatten the columns and rows. - Choose the menu icon (three dots) and choose Nest-unnest.
- Depending on the nesting, either choose Unnest to columns or Unnest to rows. In this blog post, we choose Unnest to columns to flatten example JSON file.

Repeat this step until you get a flattened json for all the nested json data and this will create the AWS Glue Databrew recipe as shown below.

- Choose Apply.

DataBrew automatically creates the required recipe steps with updated column values. - Choose Create job.

- For Job name, enter
Glue-DataBew-NestedJSON-job. - For S3 location, enter the path to the
outputjsonfolder.

- In the Permissions section, for Role name, choose the role you created earlier.
- Choose Create and run job.


On the Jobs page, you can choose the job to view its run history, details, and data lineage.
Profile the metadata with DataBrew
After you have a flattened file in the S3 output bucket, you can use DataBrew to carry out the data analysis and profiling for the flattened file. Complete the following steps:
- On the Datasets page, choose Connect new datasets.
- Provide your dataset details and choose Create dataset.

- Choose the newly added data source, then choose the Data profile overview tab.

- Enter the name of the job and the S3 path to save the output.
- Choose Create and run job.


The job takes around two minutes to complete and display all the updated information. You can explore the data further on the Data profile overview and Column statistics tabs.

Visualize the data in Quick Sight
After you have the output file generated by DataBrew in the S3 output bucket, you can use Quick Sight to query the JSON data. Quick Sight is a scalable, serverless, embeddable, ML-powered business intelligence (BI) service built for the cloud. Quick Sight lets you easily create and publish interactive BI dashboards that include ML-powered insights. Quick Sight dashboards can be accessed from any device, and seamlessly embedded into your applications, portals, and websites.
Launch Quick Sight
On the console, enter quicksight into the search bar and choose Quick Sight.

You’re presented with the Quick Sight welcome page. If you haven’t signed up for Quick Sight, you may have to complete the signup wizard. For more information, refer to Signing up for an Amazon Quick Sight subscription.
After you have signed up, Quick Sight presents a “Welcome wizard.” You can view the short tutorial, or you can close it.

Grant Amazon S3 access
To grant Amazon S3 access, complete the following steps:
- On the Quick Sight console, choose your user name, choose Manage Quick Sight, then choose Security & permissions.
- Choose Add or remove.
- Locate Amazon S3 in the list. Choose one of the following:
- If the check box is clear, select Amazon S3.
- If the check box is already selected, choose Details, then choose Select S3 buckets.
- Choose the buckets that you want to access from Quick Sight, then choose Select.
- Choose Update.
- If you changed your Region during the first step of this process, change it back to the Region that you want to use.
Create a dataset
Now that you have Quick Sight up and running, you can create your dataset. Complete the following steps:
- On the Quick Sight console, choose Datasets in the navigation pane.

- Choose New dataset.

Quick Sight supports several data sources. For a complete list, refer to Supported data sources. - For your data source, choose S3.

The S3 import requires a data source name and a manifest file. - On your machine, use a text editor to create a manifest file called
BlogGlueDataBrew.manifestusing the following structure (provide the name of the your output bucket):The manifest file points to the folder that you created earlier as part of your DataBrew project. For more information, refer to Supported formats for Amazon S3 manifest files.
- Select Upload and navigate to the manifest file to upload it.
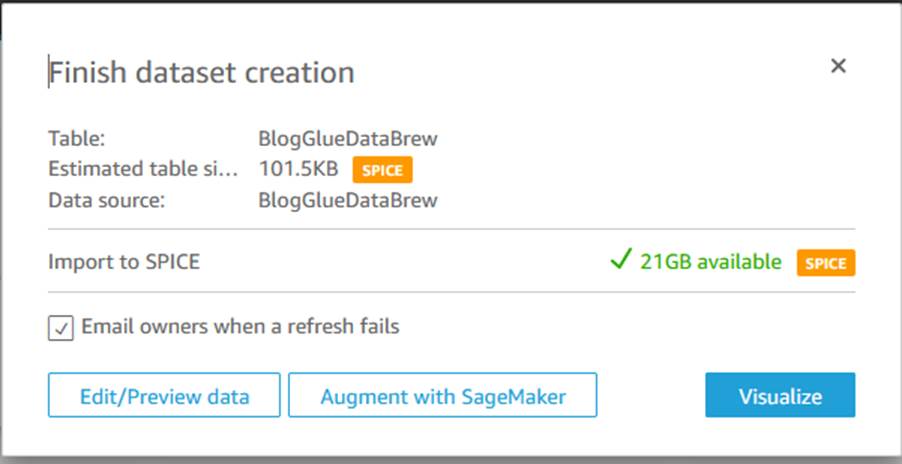
- Choose Connect to upload data into SPICE, which is an in-memory database built into Quick Sight to achieve fast performance.

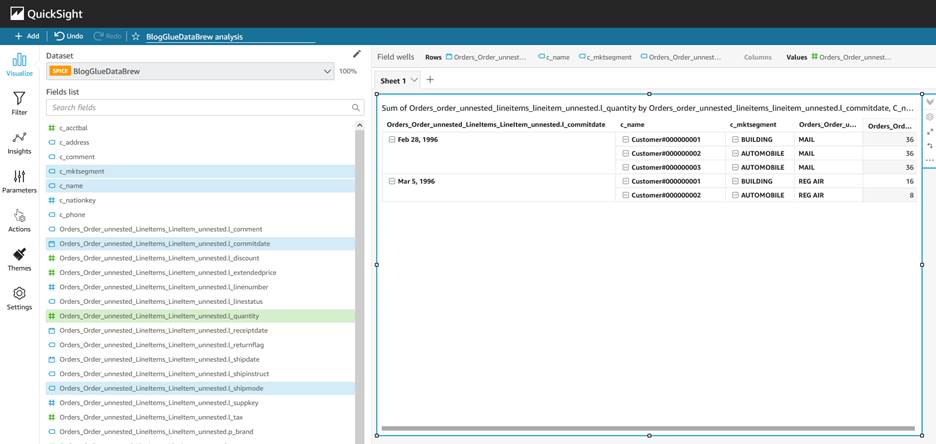
- Choose Visualize.


You can now create visuals by adding different fields.
To learn more about authoring dashboards in Quick Sight, check out the Quick Sight Author Workshop.
Clean up
Complete the following steps to avoid incurring future charges:
- On the DataBrew console, choose Projects in the navigation pane.
- Select the project you created and on the Actions menu, choose Delete.

- Choose Jobs in the navigation pane.
- Select the job you created and on the Actions menu, choose Delete.
- Choose Recipes in the navigation pane.
- Select the recipe you created and on the Actions menu, choose Delete.
- On the Quick Sight dashboard, choose your user name on the application bar, then choose Manage Quick Sight.
- Choose Account settings, then choose Delete account.
- Choose Delete account.

- Enter
confirmand choose Delete account.


Conclusion
This post walked you through the steps to configure DataBrew to work with nested JSON objects and use Quick Sight for data visualization. We used Glue DataBrew to unnest our JSON file and profile the data, and then used Quick Sight to create dashboards and visualizations for further analysis.
You can use this solution for your own use cases when you need to unnest complex semi-structured JSON files without writing code. If you have comments or feedback, please leave them in the comments section.
About the authors
 Sriharsh Adari is a Senior Solutions Architect at Amazon Web Services (AWS), where he helps customers work backwards from business outcomes to develop innovative solutions on AWS. Over the years, he has helped multiple customers on data platform transformations across industry verticals. His core area of expertise include Technology Strategy, Data Analytics, and Data Science. In his spare time, he enjoys playing sports, binge-watching TV shows, and playing Tabla.
 Rahul Sonawane is a Principal Analytics Solutions Architect at AWS with AI/ML and Analytics as his area of specialty.
 Amogh Gaikwad is a Solutions Developer at Amazon Web Services. He helps global customers build and deploy AI/ML solutions. His work is mainly focused on computer vision, and NLP uses-cases and helping customers optimize their AI/ML workloads for sustainability. Amogh has received his master’s in Computer Science specializing in Machine Learning.
This is a companion discussion topic for the original entry at https://aws.amazon.com/blogs/big-data/simplify-semi-structured-nested-json-data-analysis-with-aws-glue-databrew-and-amazon-quicksight/